Installation
Here you will find a detailed guide on how to install Cell-ACDC. We now provide an installer exe for windows, which takes care of downloading Cell-ACDC and setting it up. For this, please see section Install Cell-ACDC on Windows using the installer. In all other cases, please see Python environment guide for information on Python and how to use it. In general, you should be fine with installing the stable version, however, Cell-ACDC development is still quite rapid and if you want to try out the latest features we recommend installing the latest version. On the other hand, installing from source is required only if you plan to contribute to Cell-ACDC development. In that case see this section How to contribute to Cell-ACDC.
Install Cell-ACDC on Windows using the installer
📥 Download Cell-ACDC InstallerThe installer eliminates the need to use the terminal and provides a streamlined installation process for Windows users. It automatically sets up a Conda environment and installs all necessary dependencies, including the GUI libraries.
It ships with Miniforge as a package manager and Portable Git for version control.
Please find more information on the GitHub page.
The installation steps are as follows:
Download the installer from the link above.
Run the installer by double-clicking on it. Accept the prompt to allow the installer to make changes to your computer.
The installer will now open. Navigate the pages using the “Next” and “Back” buttons.
Choose the installation directory. We recommend leaving it as default, and not installing it in a directory which might need administrator rights to write to.
Choose the Cell-ACDC source. The installer offers four options:
Option
Description
Install Cell-ACDC from GitHub
Downloads the latest version directly from the official GitHub repository. This ensures you get the most up-to-date version with all the latest features and bug fixes. Uses either git from path or the portable git included with the installer.
Install embedded Cell-ACDC
Uses a pre-packaged version of Cell-ACDC that is included with the installer. This option works without an internet connection and guarantees a tested, stable version.
Use custom Cell-ACDC repository path
Allows you to specify a local path to a Cell-ACDC repository on your computer. This is useful if you have a custom or modified version of Cell-ACDC, or if you want to use a specific version that you have already downloaded.
Specific PyPI version
Deselect all other options to use the drop-down menu to select one of the available versions on PyPI. This will install a non-editable version of Cell-ACDC.
We recommend using “Install Cell-ACDC from GitHub” for most users to ensure you get the latest version.
Click “Next” to continue with the installation. Check the box if you want to use your own conda or python instead of the one provided by the installer.
Continue with the installation by clicking “Next”, and choose the name of the start menu folder where Cell-ACDC will be installed. You can leave the default name or choose a custom one.
Finally, use the checkbox to decide if a desktop shortcut should be created. If you want to create a desktop shortcut, check the box and click “Next”.
Review the installation details and start the installation process by clicking “Install”.
The required packaged files will be unpacked.
After unpacking, a terminal window will open which will install and set up Cell-ACDC. Please monitor it for updates on progress and for potential errors.
Once the installation is complete, you will see a message indicating that Cell-ACDC has been successfully installed. You can now launch Cell-ACDC from the start menu or desktop shortcut.
Note
If you encounter any issues during the installation, please refer to the GitHub issues page.
The installer was created using Inno Setup.
If there was an error during installation, the Cell-ACDC-installer exe can be found in the installation directory and can be run again.
Python environment guide
All other installation methods require you to have at least basic knowledge of Python and the command line.
If you are new to Python or you need a refresher on how to manage scientific Python environments, I highly recommend reading this guide by Dr. Robert Haase.
Install stable version
- Install Miniforge
Conda is the standard package manager for Python in the scientific community.
- Open a terminal
Roughly speaking, a terminal is a text-based way to run instructions. On Windows, use the Anaconda prompt, you can find it by searching for it. On macOS or Linux you can use the default Terminal app.
Update conda by running the following command:
conda update conda
This will update all packages that are part of conda.
Create a virtual environment with the following command:
conda create -n acdc python=3.10
This will create a virtual environment, which is an isolated folder where the required libraries will be installed. The virtual environment is called
acdcin this case.Activate the virtual environment with the following command:
conda activate acdc
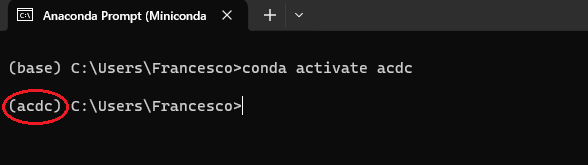
This will activate the environment and the terminal will know where to install packages. If the activation of the environment was successful, this should be indicated to the left of the active path (you should see
(acdc)before the path).Important
Before moving to the next steps make sure that you always activate the
acdcenvironment. If you close the terminal and reopen it, always run the commandconda activate acdcbefore installing any package. To know whether the right environment is active, the line on the terminal where you type commands should start with the text(acdc), like in this screenshot:Update pip with the following command:
python -m pip install --upgrade pip
While we could use conda to install packages, Cell-ACDC is not available on conda yet, hence we will use
pip. Pip the default package manager for Python. Here we are updating pip itself.Install Cell-ACDC with the following command:
pip install "cellacdc"
This tells pip to install Cell-ACDC.
Install the GUI libraries:
After successful installation, you should be able to run Cell-ACDC with the command
acdc. Remember to always activate theacdcenvironment with the commandconda activate acdcevery time you open a new terminal before starting Cell-ACDC.The first time you run Cell-ACDC you will be guided through the automatic installation of the GUI libraries. Simply answer
yin the terminal when asked.At the end you might have to re-start Cell-ACDC.
See also
This section is not valid for installation using the installer, where these libraries are installed automatically. If you prefer to install the GUI libraries manually, these are the pacakges required:
conda install -c conda-forge pyqt
conda install -c conda-forge qtpy
conda install -c conda-forge pyqtgraph
conda install -c conda-forge seaborn
conda install -c conda-forge pytables
pip install PyQt6==6.6.0 PyQt6-Qt6==6.6.0
pip install qtpy
pip install pyqtgraph
pip install seaborn
pip install tables

Updating to the latest stable version of Cell-ACDC
To update to the latest version of Cell-ACDC , open the terminal, activate the
acdc environment with the command conda activate acdc and the run the
following command:
pip install --upgrade cellacdc
Install latest version
- Install Miniforge
Conda is the standard package manager for Python in the scientific community.
- Open a terminal
Roughly speaking, a terminal is a text-based way to run instructions. On Windows, use the Anaconda prompt, you can find it by searching for it. On macOS or Linux you can use the default Terminal app.
Update conda by running the following command:
conda update conda
This will update all packages that are part of conda.
Create a virtual environment with the following command:
conda create -n acdc python=3.10
This will create a virtual environment, which is an isolated folder where the required libraries will be installed. The virtual environment is called
acdcin this case.Activate the virtual environment with the following command:
conda activate acdc
This will activate the environment and the terminal will know where to install packages. If the activation of the environment was successful, this should be indicated to the left of the active path (you should see
(acdc)before the path).Important
Before moving to the next steps make sure that you always activate the
acdcenvironment. If you close the terminal and reopen it, always run the commandconda activate acdcbefore installing any package. To know whether the right environment is active, the line on the terminal where you type commands should start with the text(acdc), like in this screenshot:Update pip with the following command:
python -m pip install --upgrade pip
While we could use conda to install packages, Cell-ACDC is not available on conda yet, hence we will use
pip. Pip the default package manager for Python. Here we are updating pip itself.Install Cell-ACDC directly from the GitHub repo with the following command:
pip install "git+https://github.com/SchmollerLab/Cell_ACDC.git"
Tip
If you already have the stable version and you want to upgrade to the latest version run the following command instead:
pip install --upgrade "git+https://github.com/SchmollerLab/Cell_ACDC.git"
This tells pip to install Cell-ACDC.
Important
On Windows, if you get the error
ERROR: Cannot find the command 'git'you need to installgitfirst. Close the terminal and install it from here. After installation, you can restart from here, but remember to activate theacdcenvironment first with the commandconda activate acdc.Install the GUI libraries:
After successful installation, you should be able to run Cell-ACDC with the command
acdc. Remember to always activate theacdcenvironment with the commandconda activate acdcevery time you open a new terminal before starting Cell-ACDC.The first time you run Cell-ACDC you will be guided through the automatic installation of the GUI libraries. Simply answer
yin the terminal when asked.At the end you might have to re-start Cell-ACDC.
See also
This section is not valid for installation using the installer, where these libraries are installed automatically. If you prefer to install the GUI libraries manually, these are the pacakges required:
conda install -c conda-forge pyqt
conda install -c conda-forge qtpy
conda install -c conda-forge pyqtgraph
conda install -c conda-forge seaborn
conda install -c conda-forge pytables
pip install PyQt6==6.6.0 PyQt6-Qt6==6.6.0
pip install qtpy
pip install pyqtgraph
pip install seaborn
pip install tables
Updating to the latest version of Cell-ACDC
To update to the latest version of Cell-ACDC , open the terminal, activate the
acdc environment with the command conda activate acdc and the run the
following command:
pip install --upgrade "git+https://github.com/SchmollerLab/Cell_ACDC.git"
Install from source (developer version)
If you want to try out experimental features (and, if you have time, maybe report a bug or two :D), you can install the developer version from source as follows:
- Install Miniforge
Conda is the standard package manager for Python in the scientific community.
- Open a terminal
Roughly speaking, a terminal is a text-based way to run instructions. On Windows, use the Anaconda prompt, you can find it by searching for it. On macOS or Linux you can use the default Terminal.
Clone the source code with the following command:
git clone https://github.com/SchmollerLab/Cell_ACDC.git
Important
On Windows, if you get the error
ERROR: Cannot find the command 'git'you need to installgitfirst. Close the terminal and install it from here. After installation, you can restart from here, but remember to activate theacdcenvironment first with the commandconda activate acdc.Navigate to the Cell_ACDC folder with the following command:
cd Cell_ACDC
The command
cdstands for “change directory” and it allows you to move between directories in the terminal.Update conda with the following command:
conda update conda
This will update all packages that are part of conda.
Create a virtual environment with the following command:
conda create -n acdc python=3.10
This will create a virtual environment, which is an isolated folder where the required libraries will be installed. The virtual environment is called
acdcin this case.Activate the virtual environment with the following command:
conda activate acdc
This will activate the environment and the terminal will know where to install packages. If the activation of the environment was successful, this should be indicated to the left of the active path (you should see
(acdc)before the path).Important
Before moving to the next steps make sure that you always activate the
acdcenvironment. If you close the terminal and reopen it, always run the commandconda activate acdcbefore installing any package. To know whether the right environment is active, the line on the terminal where you type commands should start with the text(acdc), like in this screenshot:Update pip with the following command:
python -m pip install --upgrade pip
While we could use conda to install packages, Cell-ACDC is not available on conda yet, hence we will use
pip. Pip the default package manager for Python. Here we are updating pip itself.Install Cell-ACDC with the following command:
pip install -e "."
The
.at the end of the command means that you want to install from the current folder in the terminal. This must be theCell_ACDCfolder that you cloned before.Install the GUI libraries:
After successful installation, you should be able to run Cell-ACDC with the command
acdc. Remember to always activate theacdcenvironment with the commandconda activate acdcevery time you open a new terminal before starting Cell-ACDC.The first time you run Cell-ACDC you will be guided through the automatic installation of the GUI libraries. Simply answer
yin the terminal when asked.At the end you might have to re-start Cell-ACDC.
See also
This section is not valid for installation using the installer, where these libraries are installed automatically. If you prefer to install the GUI libraries manually, these are the pacakges required:
conda install -c conda-forge pyqt
conda install -c conda-forge qtpy
conda install -c conda-forge pyqtgraph
conda install -c conda-forge seaborn
conda install -c conda-forge pytables
pip install PyQt6==6.6.0 PyQt6-Qt6==6.6.0
pip install qtpy
pip install pyqtgraph
pip install seaborn
pip install tables
Updating Cell-ACDC installed from source
To update Cell-ACDC installed from source, open a terminal window, navigate to the
Cell-ACDC folder with the command cd Cell_ACDC and run git pull.
Since you installed with the -e flag, pulling with git is enough.